
Introduction
AMRUTHA -7 eye-proof radar gun is the newest vehicle speed auto-monitor machine, which adopts low-power embedded microprocessor, integrates 8 mm microwave high-precision radar and high-resolution camera together. It is very convenient to use under different situations. The real-time road statuses can be showed on LCD, and also can be snapped based on the setting parameters. The offence records can be browsed on machine any time or be exported. It is a perfect tool for police because of its overall functions, precise proof and easy operation.
Main characteristics:
- High integration: second industrial integration of radar, camera, etc, greatly improve the capability, efficiency and reliability of system;
- Digital radar: adopt the self-developed 8mm microwave radar technique and dual channel digitalmicroprocessor, overall working modes (stationary, moving, and reverse), the radar is very precise to lock the vehicle and measure the speed;
- Good coherence: form fixed angle between camera and antenna under auto working mode, tracking and judging the object, thecoherence of image is very good.
- Using embedded operation system: large-capacity SDcard, system will be directly started by SD card, read or write to SD It greatly improves the stability and security of system.
- High Voltage Inverter Power: using the automobile cigar lighter and rechargeable Li battery as the power can last long-time continuous work.
- Using industrialmould production; structure compact; beautiful and clear display; easy operation.
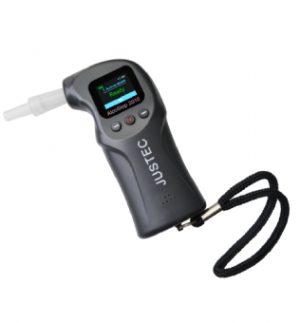
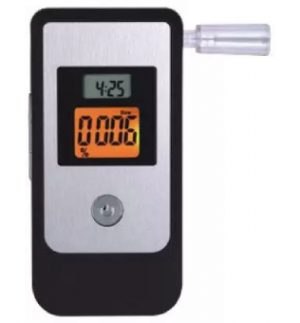
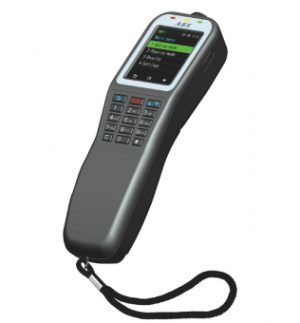
Ⅱ. Outside View
Pic.1 AMRUTHA -7 radar gun
Pic.2 AMRUTHA -7 radar gun
| 1 | SIM interface | 10 | Handle |
| 2 | USB-Slave interface | 11 | Bubble Level |
| 3 | Power hole | 12 | USB-Hose interface |
| 4 | handle snap button | 13 | Flashlight interface |
| 5 | screen | 14 | Fan |
| 6 | Button | 15 | Video input |
| 7 | Power on/off | 16 | Camera |
| 8 | mode knob | 17 | Angle bar of camera |
| 9 | Focus knob |
Ⅲ. Buttons and Interface
- Left key(←)
To show the upper record under browsing image status
To left move the image under zooming in status
To move the chosen menu item or exit the edit status under menu display status
To manual snap the image
- Right key(à)
To show the under record under browsing image status
To right move the image under zooming in status
To move the chose menu item or enter the edit status under menu display status
- Up key(↑)
To up move the image under zooming in status
To move the chose menu item or change the parameter value under menu display status
- Down key(↓)
To down move the image under zooming in status
To move the chose menu item or change the parameter value under menu display status
To switch to show or not the shutter value
To switch to show or not the camera gains status
- Mode knob
To switch the working mode
- Delete button(Delete)
To show the delete menu for user to choose if delete the current record under the image browsing status.
- Set button(Setup)
To switch display or close the manage menu
- Enter button (Enter)
To save the camera parameter value under setting status
To choose the menu item, perform the menu command, or enter the edit status under the menu status
To choose the parameter value under editing
- Cancel button(Cancel)
To close the menu under the menu status
To cancel regulation and turn to browse images under the camera regulation status
To cancel zooming under zooming status
- Focus knob
To zoom in or out image under browsing image status
To set the transparency of Alpha channel under the menu status
To change or choose the parameter value under the edit status
To change the camera parameter value, such as shutter, lens, focus, and so on, under setting camera status
- Angle barof camera
To regulate the camera position
- USB host interface
To connect with usb device for importing or exporting documents
- USB slave interface
To update software
- Power on/off button
To control the power supply
- Power hole
To connect with power
- Video input
To input video information
- Flashlightinterface
To connect with flashlight
- Handle snapbutton
To snap the image
Ⅳ. Main Indexes
- Power Supply:12V DC
- Power Supply Range:(9.5~17)V DC
- Whole Current:1.6 A
- Working Temperature:(-20~+60) ℃
- Working Frequency: (35.1±0.1) GHz
- Measuring Range:
Stationary mode : (30~220) km/h
Moving mode: self-speed (20~180) km/h, object speed (40~220) km/h
- Measuring Precision: (-6~0)km/h (when≤100 km/h), (-6~0)% (when >100 km/h)
- Vehicle Snap Rate: ≥90%
- Memory capacity: more than 4000images
- 1/4 inch CCD
- Effective pixels: 1282(H) * 960(W)
- Zoom: 18 Optical Zoom and 12 digital zoom
- Shutter: 1/4S~1/10,000S
- White balance: auto, ATW, outdoors, inside
- Aperture: automatic or manual
- Focus: automatic or manual
- Gain: automatic or manual
- Brightness: automatic or manual
Ⅴ. Working Mode
The system mainly includes: stationary angle (SA), stationary reverse (SR), moving angle (MA), stationary parallel (SP), MANUAL, moving reverse (MR), test mode (TEST) and MANAGEMENT.
Working mode can be changed by turn the mode knob, and the current mode is showed on the underside of screen.
- SA
Snap the back of vehicle, fix the angle between radar axes and road about 30 degree. If the vehicle speed is not exceed the snap speed, machine does not snap the image, just show the vehicle speed on the screen, otherwise, machine will auto snap the image.
- SR
Snap the front of vehicle, fix the angel between radar axes and road about 30 degree.
- MA
Snap the back of vehicle during moving, fix the angel between radar axes and road about 30 degree.
- SP
Snap both front and back of vehicle, make radar axes and road to nearly parallel.
- MANUAL
Just snap the offence, do not monitor the vehicle speed.
- MR
Snap the front of vehicle during moving, fix the angel between radar axes and road about 30 degree.
- TEST
Test the LDR-7 function system.
- MANAGEMENT
Manage the records: delete, export and so on.
Ⅵ. Main Functions
- Function of auto-snap
Based on the radar parameters, when monitoring the vehicle speed exceed the snap speed, machine can auto snap the image of vehicle.
- Function of manual capture
Press “←” or handle button can trigger to snap the image.
- Function of monitor speed
Machine can monitor the vehicle speed, show the value on the screen or add to image.
- Function of zooming in or out of image
When browse the records, using the “image regulation” key can zoom in or out the image
- Setting the parameters of radar and camera
Under all kinds of working mode, you can set the parameters of radar and camera, and the angle with machine, camera and road to adapt the new situation.
- Function of upgrade
It is very easy to upgrade the software by USB-S
Ⅶ. Installation
LDR-7 eye-proof radar gun can work in three ways:
- Fixing radar on tripod on roadside
- Fixing radar on vehicle
- Handle radar
The fix step of using tripod mode
- Separate three legs of tripod, put the tripod steadily on road and be parallel to road surfaceby adjust the legs.
- Fix radar on tripod
- Adjust the height of tripod to about one meter
- Regulate the radar to parallel to road by regulating lever
The fix step of vehicle mode
- Park the vehicle at safe place on roadside, making it parallel to marking line on road
- Press hard the cupulesof vehicle bracket on the windshield of car (without gap), lock tight. Keep the vehicle support be parallel to road surface, and vertical to marking line. After fixed vehicle bracket, fix the radar on bracket.
- Under the moving angle and stationary angle modes, make 30 degree angle between radar and objects, then lock tight. Under stationary reverse-rotating mode, make 35 degree angle between radar and objects, then lock tight.
Notes: after got off vehicle, two of cupules of bracket must be absorbed each other to avoid distortion.
Ⅷ. Operation
Notes:
- The items of “chosen” mentioned in operation instruction mean the current chosenmenu items which is different color background. For example as below picture, “Camera”, “Adjust_CP” and “iris adj” were chose.
- At each menu, there is indicationthat which key is effective showed by the arrow.
- Every setting is saved by press “enter” button, and press“cancel” to return.
整光圈调整光圈
- System Starting
- Connect power, after buzzer sounds a voice and power light turns on
- Press the power on/off for several seconds, voice again, system is automatic started
- Working mode change
Turn the “mode choice” knob, “stationary angle”(SA), “stationary reverse” (SR), “stationary parallel” (SP), “moving angle” (MA), “moving reverse” (MR) , “MANAGEMENT” , “test mode”(TEST) and “MANUAL” are displayed on the underside of screen, just choose one you want.
- Importing of road section, department and police
Cope the documents Road.txt, Police.txt, Dept.txt and ParaSet.xml under the path of import to USB device,then connect to USB host interface. (Emphasize: do not change the text of Road.txt, Police.txt, and Dept.txt anything.)
- Set of road, department and police
After import the information of police, department and road, just choose in right list, then press “enter” to save.
- Set of system time: to regulate the system time of machine
- Set of the maximumand minimum of speed and the start snap speed
- Set camera parameters
In order to get the clear image, to adjust camera parameters is necessary. The parameter includes shutter, manual mode, brightness, distance focus and location of camera. Usually, we command to use the default.
Auto-snap working mode
- a) Stationary Angle
Radar gun does not move, object vehicle moves far away radar gun, the angle between radar and vehicle is 30 degree, as the bellow picture. Turn the “mode choice” knob, choose stationary angle mode, regulate the shutter, focus and location of camera, making the captured image clear enough to recognize the vehicle plate. When vehicle passing and capture image succeeding, buzzer sounds a voice, and the speed value is displayed on screen.
Radar gun
- b) Stationary Reverse
Radar gun fixed, the object moves towards radar gun, the angle is about 30 degree. Turn the “mode choice” knob, choose stationary reveres mode, adjust the shutter, focus and location of camera, making the image is enough to recognize the vehicle plate.
- c) Moving Angle
Radar gun and object move the same direction, the angle between is about 30~35 degree. Turn the “mode choice” knob, choose moving angle mode, adjust the shutter, focus and location of camera, making the image is enough to recognize the vehicle plate.
- Manual Snap
- a) Use the “←” button to manual snapimage
Turn the “mode knob”, choose the item of manual capture, aim at the object, press “←”
- b) Handlesnap
Use the handle snap button on handle (see item 4 in Pic.1), turn the “mode knob”, choose the “SP”, aim at object, press the handle capture button.
- c) Stationary parallel
Turn the “mode knob”, choose the “SP”, make the radar parallel to object’s moving direction, press “←”, snap the image. When vehicle passing and snap image succeeding, buzzer sounds a voice, and the speed value is showed on screen.
- RecordManagement
Ⅸ. Mechanical dimension
Ⅹ. Packing list
| Name | Quantity |
| Host machine | 1 |
| Vehicle bracket | 1 |
| charger | 1 |
| Tuning fork | 1 |
| Power line | 1 |
| U-disk | 1 |
Reviews
There are no reviews yet.